Phishing Email Analysis Made Simple: A Practical Guide for Everyone

Phishing Email Analysis Made Simple: A Practical Guide for Everyone
In today’s digital world, email plays a crucial role in almost every field—education, business, and personal communication. However, one of the biggest risks we face is failing to verify who actually sent an email. This lack of attention is exactly what attackers exploit through phishing.
Phishing emails are designed to trick users into revealing sensitive information, clicking malicious links, or downloading harmful attachments. To effectively detect them, we must first understand how they are created and why attackers use them.
Why Do Attackers Send Phishing Emails?
Attackers don’t send phishing emails randomly—they usually have clear objectives. Some of the most common motivations include:
- Access to valuable information This could include login credentials, financial data, or personal details.
- Targeting a secondary victim Sometimes you are not the main target. Attackers may use your account to reach someone else (for example, your organization or contacts).
- Financial gain Many phishing attacks are directly linked to money—such as fake invoices, payment requests, or banking fraud.
Understanding these motives helps us recognize why certain emails are crafted in specific ways.
How Phishing Emails Are Created
Phishing emails can be created using a variety of methods. While some attackers rely on technical tools, others take advantage of modern technologies to make their messages more convincing.
- Security testing tools (misused) Tools like the Social Engineering Toolkit are originally designed for ethical security testing, but they can be misused to simulate phishing attacks and craft realistic emails.
- AI-assisted content generation Today, attackers can use AI to generate well-written, professional-looking emails. This reduces grammatical errors and makes phishing attempts much harder to detect compared to older, poorly written scams.
Let me give you an example of how attackers make the phishing mail more legitimate
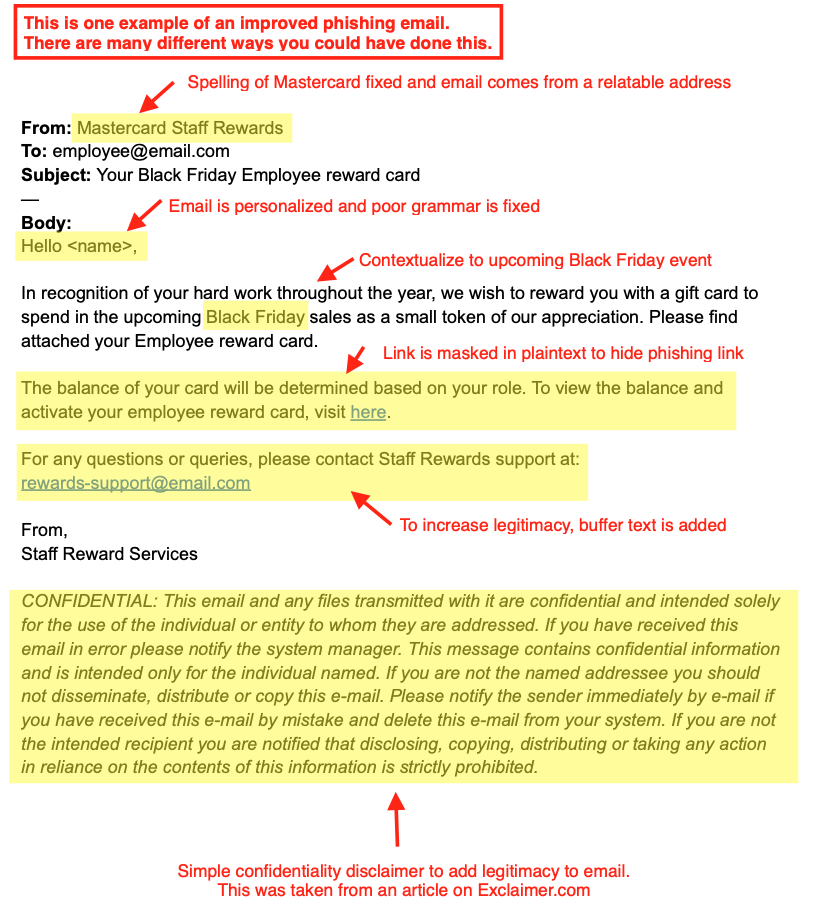
Source: Exclaimer.com
How Attackers Make Phishing Emails Look Legitimate
From the above image is an example of how attackers can improve their phishing mail to make it more legitimate.
Modern phishing emails are no longer easy to spot. Attackers put effort into making them appear authentic and trustworthy. Some common techniques include:
- Improved grammar and language Unlike older phishing emails, modern ones often use correct grammar and professional tone—sometimes generated with AI.
- Impersonation of trusted organizations Attackers often pretend to be well-known companies such as Mastercard or banks to gain trust.
- Adding support or contact details Including phrases like “Contact Support” or “Customer Service” creates a sense of legitimacy.
- Use of disclaimers and signatures Fake confidentiality notices, logos, and email signatures are added to make the email look official.
- Creating urgency Messages often pressure users to act quickly (e.g., “Your account will be suspended”) to prevent careful thinking.
- Password-Protected Attachments Attackers may send attachments (such as ZIP or PDF files) protected with a password. This prevents email security systems from scanning the file for malware, allowing it to bypass detection. The password is often included in the same email, which can create a false sense of security and encourage users to open the file.
Now that we understand how phishing emails are created and why attackers use them, the next step is learning how to detect and avoid them.
Recognizing phishing attempts is a critical skill that can protect your personal information, finances, and professional environment.
Detecting Phishing mail
Now after understanding how the attacker’s create phishing mail now it is time to understand on how to detect such phishing mails and save yourselves. Lets look at the example down below.
Email Content
Subject: Urgent: Your Mastercard Account Has Been Suspended
Dear Customer,
We detected unusual activity on your account. For your security, your account has been temporarily suspended.
Please verify your account immediately to avoid permanent suspension:
👉 http://mastercard-secure-login.com/verify
If you do not respond within 24 hours, your account will be permanently blocked.
Thank you,
Customer Support Team
Mastercard Security Department
Technical Detection Method
You can take a closer look of the email by simply clicking on “Show original” ( look image down below)
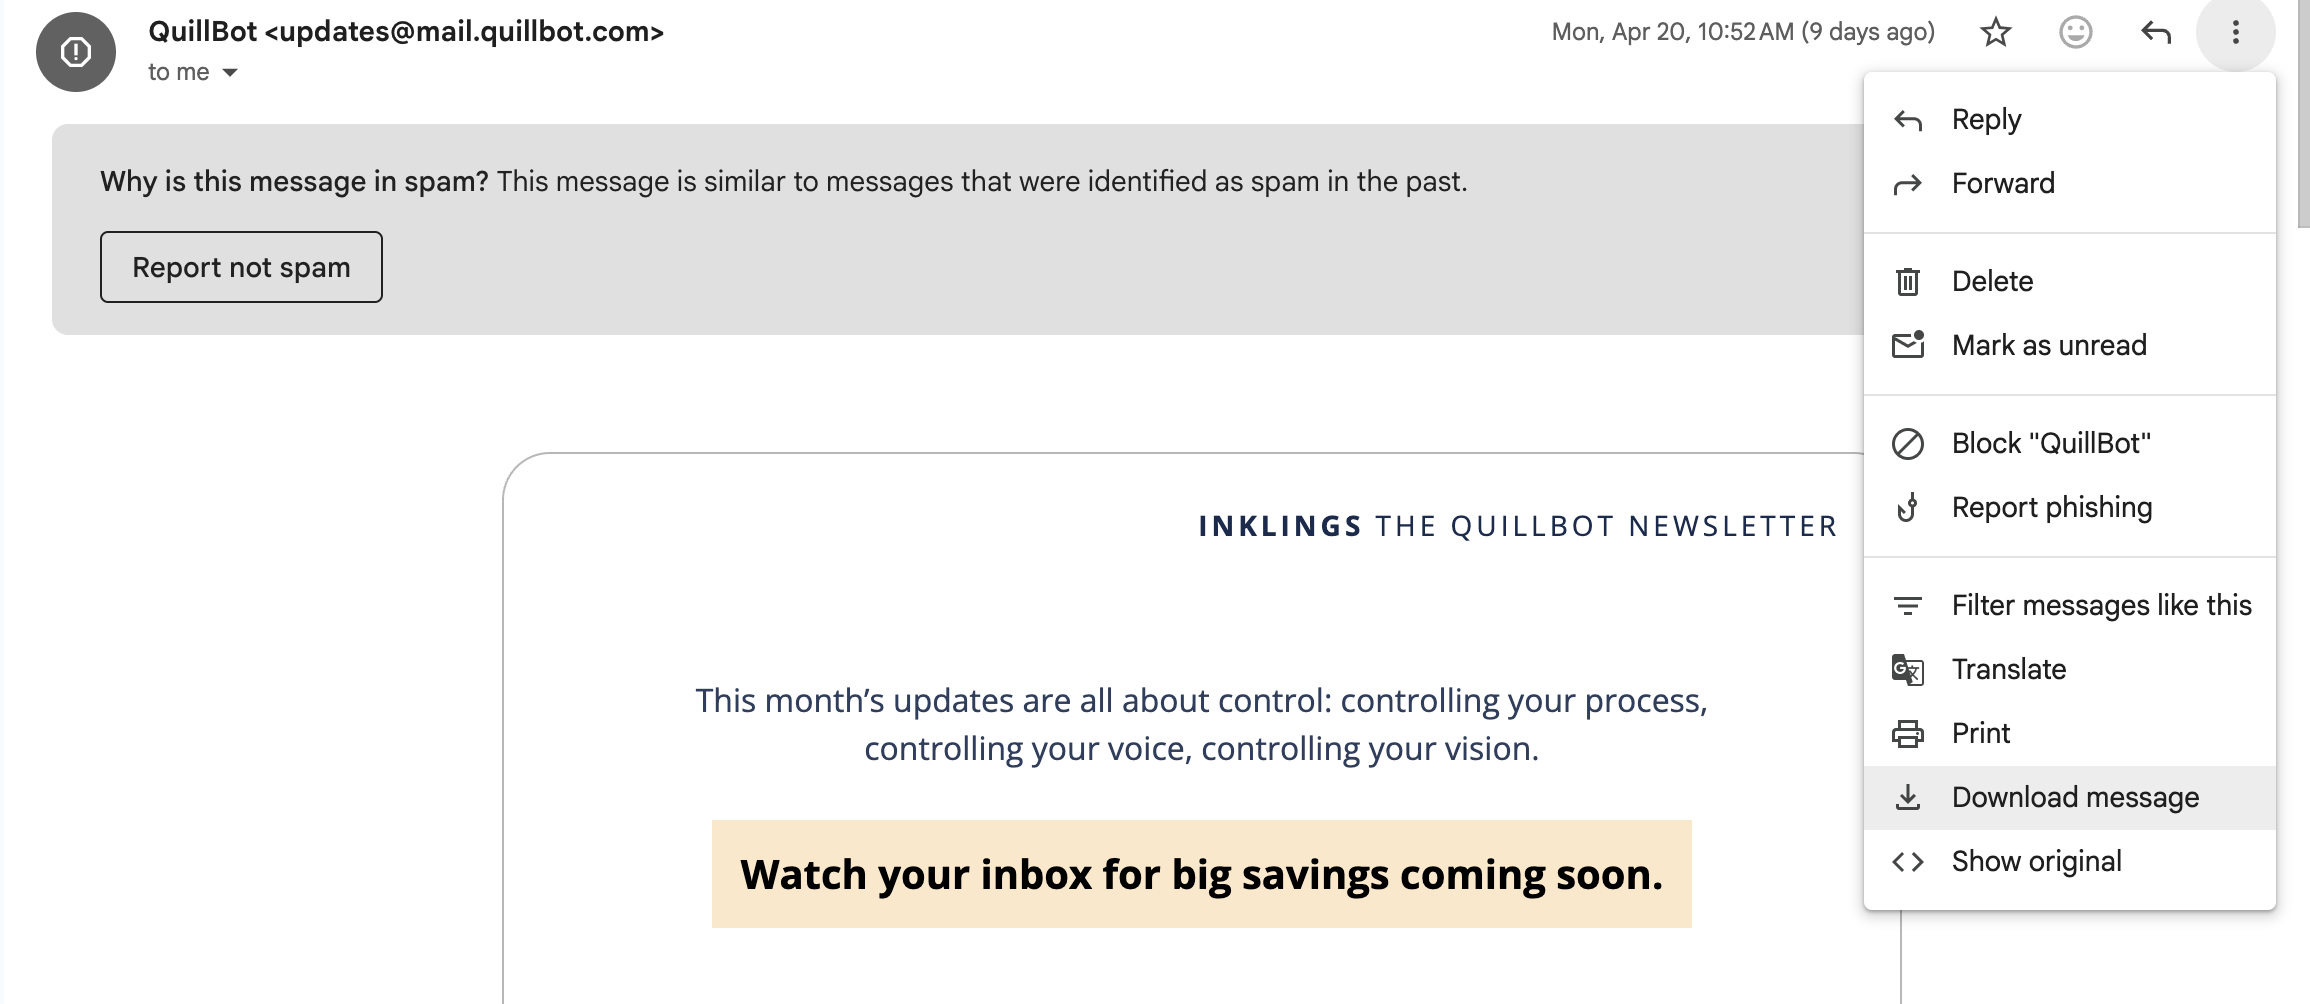
Show Original Option on Gmail.
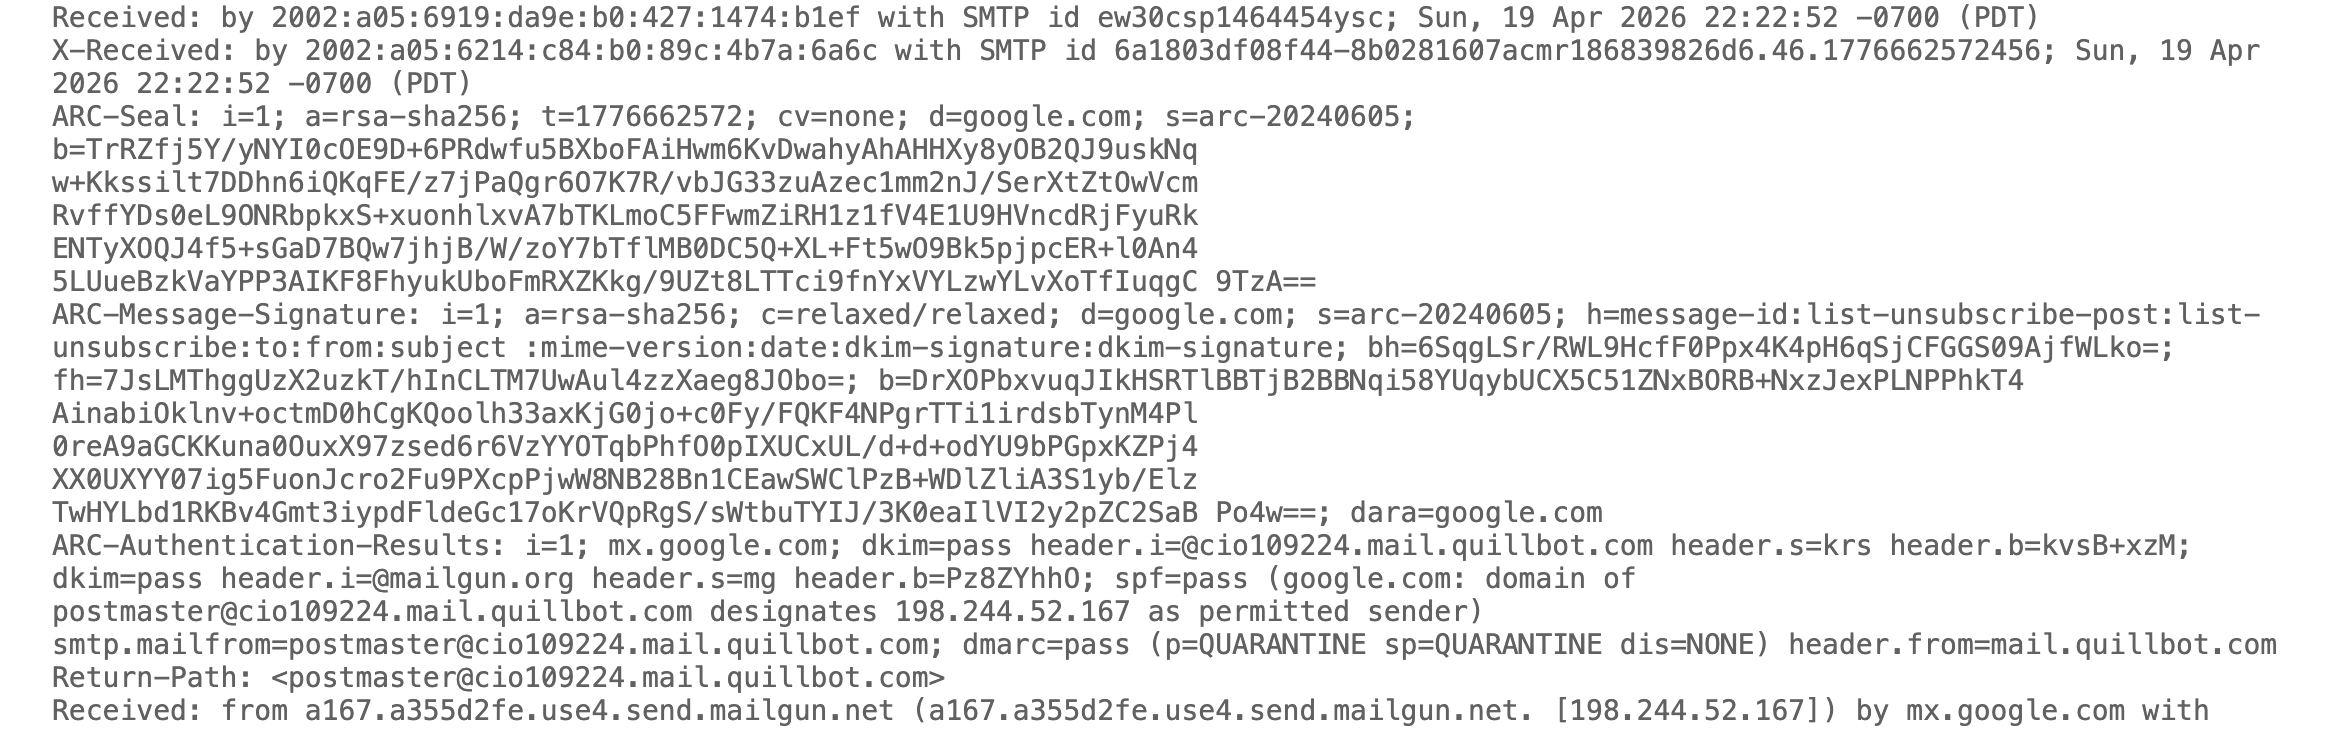
These methods rely on email authentication systems and deeper inspection of message data.
From: support@mastercard.com
Reply-To: attackerhelpdesk@gmail.com
Return-Path: random@malicious-server.ru
SPF: Fail
DKIM: Fail
Try to focus on these parts first as these would reveal a lot information about it.
SPF (Sender Policy Framework)
- Verifies whether the email was sent from an authorized mail server.
- If SPF fails, the email may be spoofed.
- Found in email headers as “SPF = Pass/Fail”.
👉 Example: If an email claims to be from a bank but originates from an unknown server, SPF will likely fail.
DKIM (DomainKeys Identified Mail)
- Uses cryptographic signatures to ensure the email content has not been altered.
- Confirms that the email truly comes from the stated domain.
👉 If DKIM fails, the message may have been tampered with or forged.
DMARC (Domain-based Message Authentication, Reporting & Conformance)
- Works with SPF and DKIM to enforce policies.
- Helps domain owners specify how to handle failed authentication (reject, quarantine, or allow).
👉 Strong DMARC policies reduce spoofing attacks significantly.
Email Headers Analysis
Important Fields
From:
The ‘From’ field in an Internet header shows the name and email address of the sender.
To:
This field in the mail header contains the details of the recipient of the email, including their name and email address. Such as CC (carbon copy) and BCC (blind carbon copy) also fall under this category, as they all contain details of your recipients.
To find out more about carbon copy and blind carbon copy, see How to use CC and BCC.
Date:
This is the timestamp showing when the email was sent.
In Gmail, it usually follows the format day dd month yyyy hh:mm:ss
So if an email was sent on 16 November 2021 at 4:57:23 pm, it would show up as Wed, 16 Nov 2021 16:57:23.
Subject
The subject is the topic of the email. It summarises the content of the entire message body.
Return-Path
This email header field is also known as Reply-To. When you reply to an email, the reply is sent to the address specified in the Return-Path field.
Domain Key and DKIM Signatures
Domain Key and Domain Key Identified Mail (DKIM) are email signatures that help email service providers identify and authenticate your emails, similar to SPF signatures.
Message-ID
The Message-ID header is a unique combination of letters and numbers that identifies each email. No two emails will have the same Message ID.
MIME-Version
Multipurpose Internet Mail Extensions (MIME) is an Internet coding standard. It converts non-text content, such as images, videos, and other attachments, into text so that non-text content can be attached to an email and sent via SMTP (Simple Mail Transfer Protocol).
Received
The Received section lists each mail server that an email has passed through before arriving in the recipient’s inbox. It’s listed in reverse chronological order - the mail server at the top is the last server the email message passed through, and the mail server at the bottom is where the email originated.
X-Spam Status
The X-Spam Status shows you the spam score of an email message.
First, it’ll highlight if a message is classified as spam.
It then shows the spam score of the email and the spam threshold for the email.
An email can either meet or exceed an inbox’s spam threshold. If it’s too spammy and exceeds the threshold, it’s automatically classified as spam and sent to the Spam folder.
Field Definitions: gmass.co
URL Inspection
- Hover over links to reveal actual URLs.
- Look for:
- Misspelled domains (e.g.,
paypa1.cominstead ofpaypal.com) - Use of URL shorteners
- HTTP instead of HTTPS
- Misspelled domains (e.g.,
Attachment Scanning
- Suspicious attachments (especially
.exe,.zip,.html) may contain malware. - Use antivirus or sandbox tools before opening.
Non-Technical Detection Method
These are practical checks anyone can perform without technical knowledge.
Check the Sender Carefully
- Look beyond the display name.
- Verify the actual email address.
👉 Example:
“Mastercard Support” might actually come from support@fake-domain.com.
Be Wary of Urgency
- Phrases like:
- “Act immediately”
- “Your account will be suspended”
- These are designed to create panic and bypass logical thinking.
Look for Unusual Requests
- Legitimate organizations never ask for:
- Passwords
- OTPs
- Full banking details via email
Check for Inconsistencies
- Logos that look slightly off
- Generic greetings like “Dear Customer”
- Slight formatting issues
Avoid Clicking Links Directly
- Instead of clicking links in emails:
- Open your browser
- Manually type the official website
Trust Your Instinct
- If something feels off, it probably is.
- When in doubt, verify through official channels.
Final Thought
Phishing attacks are becoming more sophisticated, especially with the help of AI and automation. This means detection is no longer just about spotting spelling mistakes—it requires awareness, skepticism, and sometimes technical verification.
The safest approach is a combination of:
- User awareness (non-technical skills)
- Security controls (technical measures)
Together, they create a strong defense against phishing.
Tools for Phishing Analysis
If you want to go a step further, these tools can help verify suspicious emails safely:
1. MXToolbox
Check SPF, DKIM, DMARC records and analyze domains.
2. VirusTotal
Scan links, files, and IP addresses using multiple security engines.
3. AbuseIPDB
Identify whether an IP address is associated with malicious activity.
4. URLScan.io
Analyze suspicious websites and observe their behavior safely.
5. Google Safe Browsing
Quickly check if a website is flagged as unsafe.
Never upload sensitive company data or confidential emails to public tools unless permitted.
Phishing Response Playbook
If you encounter a suspicious email, follow this step-by-step approach:
Step 1: Pause and Do Not Interact
- Don’t click links
- Don’t download attachments
- Don’t reply
Step 2: Verify the Email
- Check sender address carefully
- Hover over links
- Look for inconsistencies
Step 3: Perform Technical Checks (if possible)
- Analyze headers (SPF, DKIM, DMARC)
- Scan links using tools like VirusTotal
- Verify domain via MXToolbox
Step 4: Report the Email
- Use your email provider’s “Report Phishing” option
- Inform your organization’s IT/security team
Step 5: Delete the Email
- Once reported, remove it from your inbox
Step 6: If You Already Clicked Something
Be direct here—this is where many guides fall short.
- Disconnect from the internet (if malware suspected)
- Change passwords immediately
- Enable 2FA if not already enabled
- Run a full antivirus scan
- Inform IT/security team (for workplace accounts)
Step 7: Monitor for Suspicious Activity
- Watch for:
- Unauthorized logins
- Strange emails sent from your account
- Financial transactions
Scan links, files, and IP addresses using multiple security engines.
Thank You for Reading 🙌
Thank you for taking the time to read this guide on phishing email analysis. I hope it helped you understand both the technical and non-technical ways to identify and defend against phishing attacks.
If you found this useful, feel free to share it with others—spreading awareness is one of the strongest defenses we have against cyber threats.
Let’s Connect on LinkedIn 🔗
If you’re interested in cybersecurity, SOC analysis, or hands-on learning like this, let’s connect!
👉 Follow me on LinkedIn for more content, practical guides, and insights:
LinkedIn Profile
I share learning resources, project experiences, and cybersecurity concepts explained in a simple way.